Wednesday 29 August 2012

Heaven has a beautiful voice...

Hello Earthlings,


Today is the birthday of the King of pop, Michael Jackson. What a loss to the world he was. Often imitated though never duplicated no matter what. His music bought a message to the world like no other. His videos always had an intriguing and exciting story to tell. A true inspiration to all. So we're going to stop speaking and let his electrifying music do the talking. All of his songs are AMAZING, we do love us some Billie Jean and some Thriller, but we disciplined ourselves to just 10. (okay okay we will shut up now) Engage in escapism dudes...


1. You Rock My World


2. Remember The Time


3. Black or White


4. Heal The World


5. The Way You Make Me Feel


6. Smooth Criminal


7. Beat it


8. Bad


9. Speed Demon


10. Leave Me Alone


*Listen to ze hyperlinks*

And there you have it children, our top 10 MJ songs. Do you agree with our order ?? Of course you do.
Fashion etc. Music and fashion go hand in hand. This concept is fully put into practice through the influence that MJ had in the fashion industry. We do so lurve to push fashion boundaries, and so naturally, we admire the this-is-how-I-do manner of dressing that MJ bestowed upon us. Here's the ingredients to create an MJ inspired look.
(p.s. raise your hand if you think Sharrie's style is slightly MJified, teehee)

(1) Pull and Bear tee, £15.99 (2) H&M hat £12.99 (3) H&M aviators £4.99 (4)River Island Leather jacket £55.00 (5) H&M Super skinnies £29.99 (6) Top Shop Sequin Jeans £70.00 (7) Republic leather jacket £60.00 (8) Top Shop finger-less leather gloves £22.00 (9) New look bangle £5.99 (10) River Island blazer £35.00 (11) Missguided blouse £22.99 (12) Barrats Brogues £40.00 (13) Ebay bow tie £1.79

Hope you enjoyed our second joint post! We don't do it often, because apparently we're crazy individuals and we really don't want to overwhelm you. Anyway, hope our inspiration has inspired you to be inspirational(teehee). Off we go, to finish watching 'This is it'.

Live long and prosper Dudes ♥ (says Sharrie)
God bless, take care and other such ramblings ♥ (says Ammie)

Ammie + Sharrie xx

Friday 24 August 2012

Just making and fixing things.

Hello chums,

Firstly, hope you guys have had an awesome week (: You must must must forgive us for the lack of posts this week. WE HAVE NOT ABANDONED YOU! Plus we have ample reason... WE GOT ZE GSCE RESULTS YESTERDAY !!!!!! We're so "hkahbvsnc" and happy with the outcome, we hope and pray that those who collected GCSE's are as proud of yourselves as we are *synchronized scary grins*

Right on with today's post...
I think my style is quite London Girl,with a massive dose of the 60's. And I tried to channel that through this outfit post. To be quite fair, it's a lazy outfit, not really deserving more than an appreciative nod. But that's because I really wanted the jumper to be the focus. It's something I made through the summer to build up my wardrobe for sixth form (argghhhhh!!!). It says, Insouciant which means care-free and unconcerned, which I really need to be as I am such a STRESS HEAD. Oh yeah, and when I say I made it, I mean my beloved nana sat adjacent to my hip, insisting that she "fixes a few things".I am sooo not a perfectionist.


Friends I must also share with you what I discovered whilst cleaning out my jewellery box. Yonks ago, I broke my fave River Island necklace (oh how I love the RI sale). It was one of those 'un-fixable' breaks because the actual chain had snapped. But then I was thinking, what could I do with it as their was NO WAY I was just chucking it away and admitting defeat. I found my answer in the form of a lonely earring (it's lonely because I lost the other one).

Step 1: stick the lonely earring into the hole of the chain.

Step 2: Secure it by putting the butterfly back at the end of the earring

Step 3: Use the hook and put it through the butterfly back.


And juuuuuust to show you it works ...
Any comments and feedback would be appreciated, thanks for bothering to read though, I know I waffle :P.

Ammie xx(:

Friday 17 August 2012

D.I.Y: Something in a bottle...

Hello Earthlings,


Don’t you just love it when something comes in the post for you? It’s the bomb diggidy right?! Well from this excitement led to this D.I.Y post. Yes, I know, I’m spoiling you lovelies; but you should love it! It’s something I like to call: Something in a bottle. It’s so simple. Didn’t even take two days to post it on the blog- get inn!!! So seeing as it’s a simple D.I.Y, I shall stop babbling on. Have fun creating :D

Your helpers:
- Chain
- Jump rings
- Scissors
- Mini glass bottles
- Corkscrew (mine came with the bottle)
- Glitter
- Screw eyes
- Strong adhesive
- Letter beads
- Charms
- Beads
- Flash card
*I got most of my helpers from Ebay*

NOTE: there is no rule for what should be in this bottle. It is totally up to you, whatever you like. Heck you can even put in a crushed up Oreo. The possibilities are endless. Just make them unique to suit you. But feel free to do one like mine dudes.

1. Place the screw eye in the centre of the corkscrew.
2. Start to turn it clockwise applying pressure so it will go into the corkscrew. Once it can’t go down anymore, it should look like this.

3. Take the jump ring and open it with pliers or in my case scissors- they both do the job. Put it through the screw eye.
4. Take the middle link of the chain and connect it through the jump ring.
5. Once it’s in the right place, take your pliers/scissors and close the jump ring.

6. So if you decided to use glitter, this is an easier way. Take your flash card and fold it in half.
7. Put some glitter in the centre (where the fold is).
8. Now tap the glitter into the bottle from the start of the fold.

9. Why I didn’t take a picture of how I got this I will never know, but I shall tell you haha. I basically glued letter beads together, vertically. But I did mine slanted as I didn’t want them to be dead straight – booooring. Then I used a normal bead to glue it to the corkscrew, so the word is fully shown. I used a generous amount of glue.
10. Finally, once you’ve finished filling your bottle, put a strong adhesive around the whole bottom side of the corkscrew. Stick it in, and voilĂ ! You’re finished!

Well as I mentioned Oreos before, I’ll let you know it was for a good reason. Look at these American bad boys we got. Now they are truly the bomb diggidy. They are just ahhhhhh soo nice, you need these in your life ♥_♥.

Well dudes, that is all I have for you today. Okay ,now now, stop the crying, it’s okay *LOL i joke*. There shall be more ahead. Hope I have inspired you to get creating. These are so cute, I love them. Another good thing that is amazing about this is that there is no wrong or right way. Anything looks good in this! Just go crazy. Love you all earthlings.

Live Long and Prosper Dudes ♥
Sharrie xXx

Thursday 16 August 2012

D.I.Y: Peter Pan Collars


Hello peoples.

Got a DIY post for ya today. I really love the fact that peter pan collars are popping up everywhere; cos they’re awesome. I guess what I love about collars, or all accessories, is the fact that you can change an outfit in an instant. ‘A girl is simply not a girl without her accessories’- A wise girl (It’s me).

Right, on with the tutorial…
You will need:


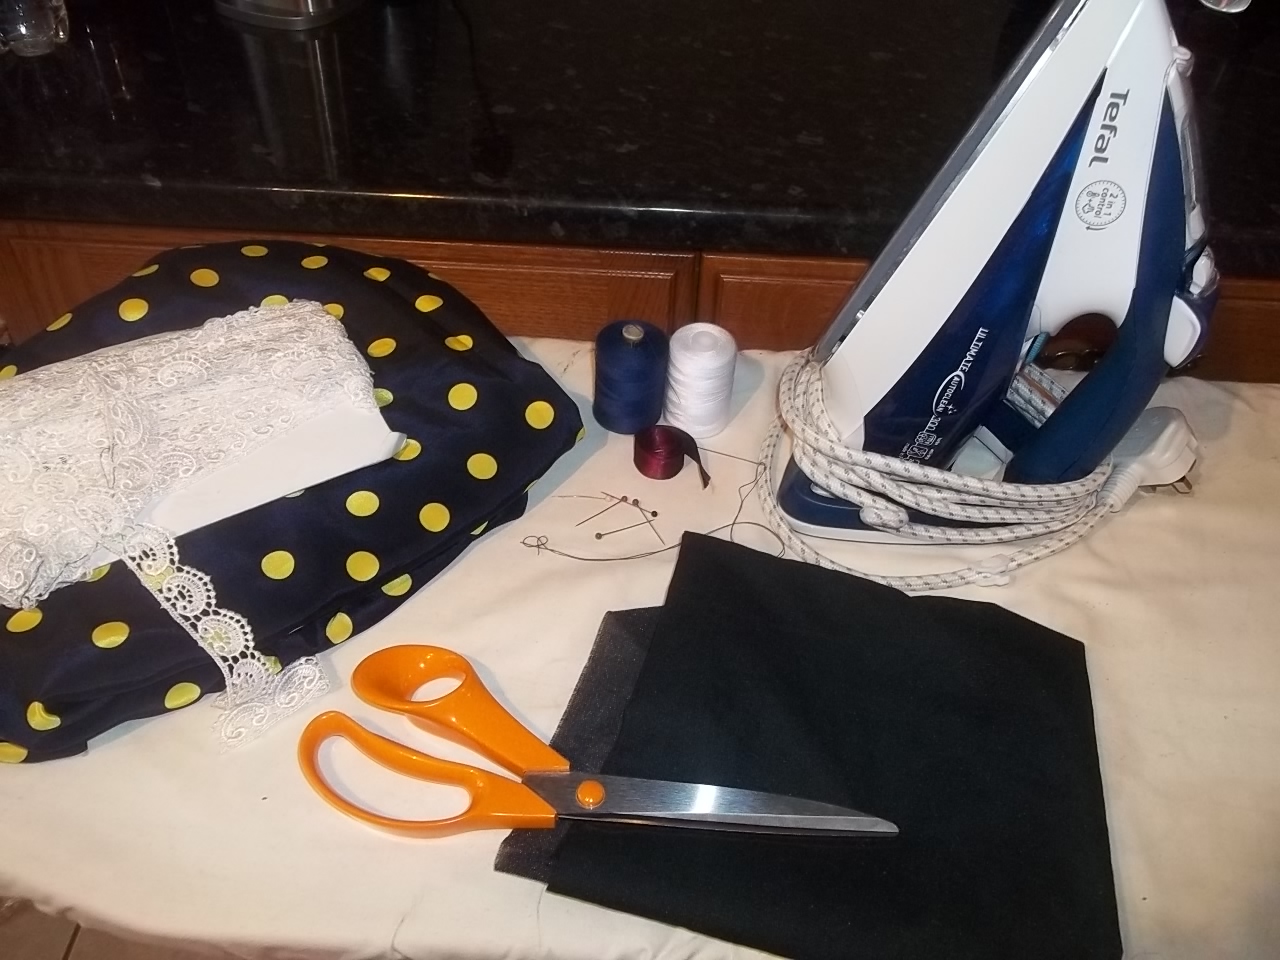
- Pattern for the peter pan collar, try these (you must forgive me, I can't find the pattern so it's not in the pic above)
- Scissors
- Your chosen material
- Ribbon
- Needle and thread or sewing machine
- Interfacing (or iron on)
- Iron
- Pins
- Any other decorative bits (like lace)

You can just get your bits from an Haberdashery or material shop.
& there is no real quantities to follow, as in, use as much material as your pattern desires (which won’t be a lot)

Since Sharrie and I have been learning Italian, I feel obliged to do the steps in Italian. (:

Step uno: Cut out the pattern. (sooo sorry I don’t have a picture for this, I was working on a dress that had peter pan collars and so I just used the collars from there). Actually, if you buy the pattern with a dress then you can make a dress as well as a collar.

Step due: Cut the material out using your pattern as your template. To do this accurately, use your pins to pin the pattern to the material. NOTE: your two collars have to be symmetrical !! Or it really doesn’t look good, as I’ve learnt.

Step tre: Now use your interface. Cut the interface into the shape of your collars by cutting around the collars as a template (or you could just iron the interface onto the material and cut around the shape after). Interface is something that you iron onto the material to make it stronger and easier to work on, especially if your chosen material is thin or delicate. NOTE: it can get complicated because you must use the rough side of the interfacing and place it on the side you are ironing on. I.e. when you iron, it must be ironing the smooth side or it will stick to the iron. Very difficult to remove. Oh and I should mention that you use white interface for a lighter material and black interface for a darker material.


Step quattro: Time for the gathering. This is just to make it easier to bend around your collar.


Step cinque: Now hand sew the gathering to the top of your material. Do it tight enough not to fall apart but don’t spend too much time on it, as the stitching will be covered.


Step sei: Place the ‘right’ side of the materials face to face (these are the sides that you want to show).

Once you’ve done that, create your guide line (what you’re going to stitch on if you use a sewing machine) NOTE: keep it near the edge of your collar or you may end up losing a lot of material. - If you’re doing it by hand then stitch it tightly like so,
- If you’re using the sewing machine then stitch it lightly with gaps, like so.
It’s very important to leave the end open for the lace to go in, and also for you to turn it inside out !!

It should look a little something like this. Just like a sock.


Step sette: If you’re using the sewing machine, then sew using your guideline.


Step otto: Turn your material inside out and prepare to start sewing the end up. You can out the ribbon at whatever length suits you. After my third attempt (cringe) I have decided that the short lace looks better.


Step nove: Final step, sew the two collars together. Do it as tight as possible, ensuring that you sew it right in the centre. It also helps if you keep them in line with each other, you’ll see what happens when you ignore this rule.


And then you’re durnnnnn !

My first collar didn’t exactly turn out well… I still love the vintage feel to it though, just not sure if I can get away with it…


My second attempt was better. Simplicity won me over, and also the fact that I can wear it with anything.


And then we have my final attempt (for this week), which is a bit more ‘notice me’. I’m excited to experiment with some pattern clashing with these collars.
Ammie xx

ohhhh wait, I have to share this AMAZING thing that I came across whilst blog surfing. Sooo inspiring !!

Tuesday 14 August 2012

Man, I'm such a rebel. Sometimes.

Hello old chums,

Being a 60's girl and all, I scarcely wander outside of the peter-pan collar/colour block manner of dressing . But all has changed. Well, for today's post anyway.

Lately, I have found myself sheepishly attracted to the grungy side of the 90's. To be honest, I am not really one to lust over fashion trends or 'what's in season', (I am particularly allergic to that forbidden phrase) but I can't help noticing the revival of the 90's, when John Lennon glasses and studded collars are peeping up everywhere!
Anyway, here's what happens when Ammie becomes subject to fashion trends...

denim sleeveless shirt; Primark
maxi skirt; Topshop
brogues; Boulevard
sun glasses; portobello market
ear cuff; River Island
coat; Vintage


Subtract my facial expressions and impromptu jumping, and I believe that I could perhaps waltz into the 90's un-noticed, daren't I say that I would fit in??!!
I should probably mention that this outfit would look a whole lot better if I had my biker boots. I am currently at my grandparents house (as you do during summer. Or as I do), so I really couldn't be bothered to pack those heavy boots with me. Pray you imagine the outfit with boots though.

Enough of my rambling though, I have made you guys a grungy wish list.


Okies, (1)H&M bag £29.99 (2)Topshop John Lennon glasses £16.99 (3) Pull&Bear sleeveless shirt £22.99 (4) Matalan coat £32.00 (5) Urban outfitters Tom boy boots £65.00 (6) River Island jeggings £35.00 (7) River Island ear cuff £4.00 (8) Newlook hat £10.00 (9) Urban outfitters creepers £55.00 (10) Dorothy Perkins ring £5.00 (11) missguided maxi skirt £19.99 (12) Republic Gillet £15.00 (13) River Island tee £16.00 (14) Newlook dungarees £25.99 (15) Topshop dip dye tee £32.00

And there we have it amigos. Hope there's something there for you, I'm not going to lie, I could just live in those River Island Jeggings. And no that's not betrayal of my beloved 60's... Maybe I could get away with a fusion of the 60's and 90's ?

Ammie xx